In order to update token information on Etherscan, the token contract address for the token must be verified. That is to ensure that the contract code is exactly what is being deployed onto the blockchain and allows public to audit and read the contract. Etherscan ensures all token contract must be verified before they can be updated with information submitted by the contract owner.
How to start verifying #
The first thing to do is to go to Etherscan and open the Smart Contract Verification tool:

It is a two-step process:
- Provide the address and information about the environment in which the smart contract will be created, or find your contract from Etherscan and point it directly to the Smart Contract Verification tool.
- Provide detailed information about the smart contract itself.
Provide information about the smart contract environment #
In this step, you need to fill in three fields. Compiler Type is the type of project you have before deploying a contract on the Etherscan network.
The Etherscan Smart Contracts Validation tool provides four options for the compiler type.
- Solidity – single file
- Solidity – multiple files
- Solidity – standard JSON input
- Vyper – currently marked as experimental
After selecting the compiler type, the Compiler Version field will appear. You need to use it exactly right, otherwise Etherscan will not be able to validate your smart contract. Therefore, make sure you know exactly which compiler version you are using when constructing your contract and then select it from the drop-down options. For example, you can find the compiler version on remix.
After selecting the “Compiler Type” and “Compiler Version” and providing the contract address, you need to select an “Open Source License Type”. The current options are:
- No license
- Unlicense
- MIT License
- GNU General Public License v2.0
- GNU General Public License v3.0
- GNU Lesser General Public License v2.1
- GNU Lesser General Public License v3.0
- BSD 2-clause “Simplified” license
- BSD 3-clause “New” or “Revised” license
- Mozilla Public License 2.0
- Open Software License 3.0
- Apache 2.0
Once you have done so, you can accept the terms and proceed to the next and final step of the verification process.
Provide smart contract details #
For demo, this article will use single file “compiler type”, but the rest of the options are similar in process.
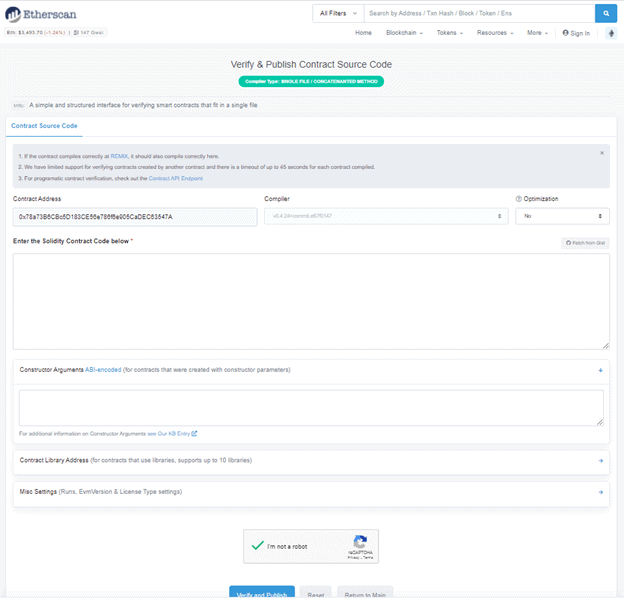
The first row of fields contains the details provided in the first step, as well as options for specifying whether to use optimization when compiling the contract. For those issues that are not recognized, the compiler’s optimization options will attempt to remove unneeded instructions to reduce gas consumption.
Next is the source code for your smart contract. In our example, we have a text area where we need to paste the code, but, for example, in the case of selecting the “compiler type” for multiple files in the first step, we will have a file upload input that can be used to upload all the files for the deployment contract.
Constructor arguments #
This section can be skipped if no arguments are provided when deploying the contract, however, if you do so, you will need to provide the value of its ABI code. However, it is actually possible to verify without any ABI code values.
To do this, you can use the ABI encoding tool from HashEx. scroll down to the “or manually enter parameters” section and enter the parameters, making sure to select the correct type from the drop-down list.
Library #
The section below the Constructed Function Parameters section is the Smart Contracts Library address. It allows you to add the name and address of the smart contract used by the smart contract.
For example, if your smart contract is too large, you can split it into two smart contracts. You can then deploy one smart contract (a smart contract with some of the utility features used by the second smart contract), then deploy the second smart contract and specify that it uses the first smart contract as a library during the validation process.
This section is optional and is only required if your smart contract uses the functionality of another smart contract already deployed on the Ethernet network.
Miscellaneous settings #
You can choose to modify other settings (they have default settings).
- Runs – the number of code runs you want to optimize the program to run.
- EVM version – The specific version of the Ethernet virtual machine you want to compile.
- License type – This is the same as the one we introduced in the first step of the validation process.
In most cases, you do not need to change any of these settings.
After providing all the details correctly, please prove that you are not a robot and click on the “Verify and Publish” button. If everything goes well, the contract will be verified and you will be able to view its code on the “contract” tab of the Etherscan page of the smart contract.